
BUT STILL DELICIOUS!
Sorry to yell at y’all (6 months in New Orleans!) but I do feel like this is an important disclaimer, because even here in LA (land of gluten free everything) gluten free baked goods aren’t always the most delicious.
Or moist. Gross word, but true.
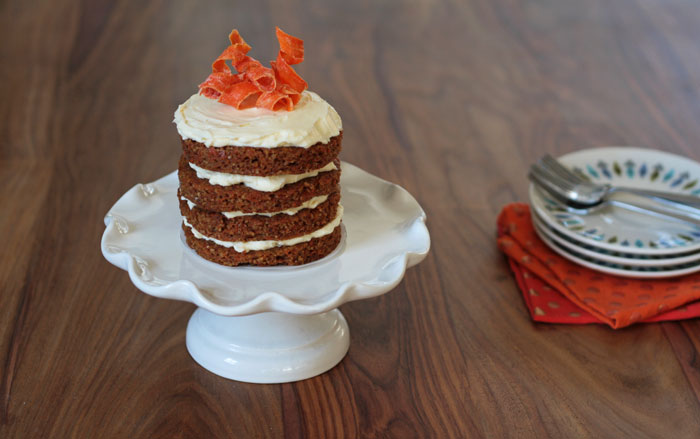
This little cake, however, is an economy sized vehicle of SUV sized flavor. Wait, that’s a terrible metaphor. This little cake is an economy sized vehicle for mouth-wateringly amazing flavor of Monster Truck magnitude. Okay. I give up. This little cake is just plain delicious- it’s full of flavor (and carrots!) and it’s really easy to make.
It doesn’t require any fancy cake pans or piping bags or dare-I-say baking skills. It’s a winner. And the adorable boyfriend told me it was better than the carrot cake at the bakery across the street. And carrot cake is his favorite, so I actually believe him. High praise. Also, not to harp on the GF thing, but neither of us are gluten free, so if this wasn’t delicious, I’d just throw a shit ton of regular flour in it and be done already.

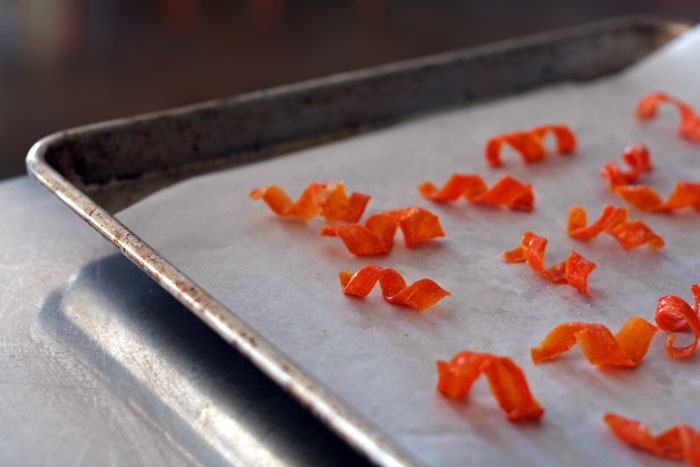
The candied carrot curls are definitely the most difficult part of this recipe. And they’re really more sticky than difficult. But damn, they’re cute, right?! Not to mention they’re basically carrot candy. Health food I tell you.
You can even make them a few days ahead of time if you like, since besides being sticky, they’re a little time consuming. Or you can skip ’em entirely and get right to the cake eating!

- 1 cup grated carrots (I used 5 organic, aka puny carrots)
- 1¼ cups almond flour
- ½ cup coconut milk
- 2 eggs
- 1 teaspoon cinnamon
- ½ teaspoon nutmeg
- ½ teaspoon salt
- ½ teaspoon baking soda
- ¼ teaspoon allspice
- 1 stick butter (8 tablespoons)
- 1 package cream cheese (8 oz)
- 1 cup powdered sugar
- 1 teaspoon vanilla
- 2 carrots
- ½ cup water
- ½ cup sugar
- Grate the carrots- they should be one level above carrot zest or mush, but still pretty fine. (I used our cheese grater)
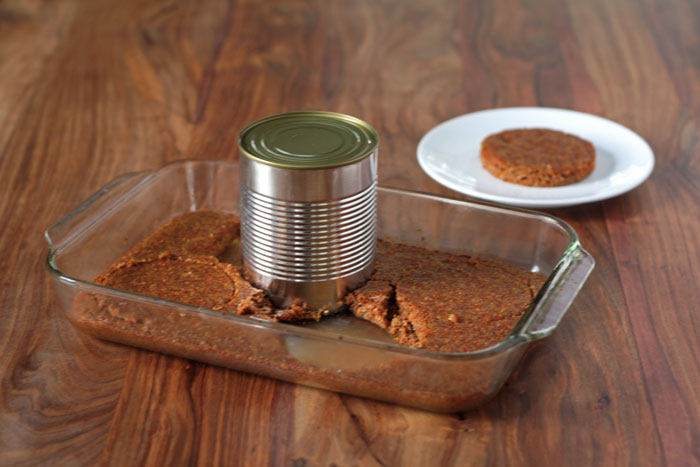
- Mix all ingredients for cake in a bowl and pour into a buttered 9x13 pan.
- Bake cake at 350 degrees for 20-25 minutes.
- While cake bakes, make the frosting: mix softened butter & cream cheese with sugar & vanilla in a stand mixer or by hand until smooth and creamy.
- Let cake cool completely, then use a large empty can (29oz) to cut 4 round cake layers.
- Cut a round piece of parchment paper by tracing the can and put this under the first cake layer on a flat plate- the parchment makes it easy to move your cake to a clean plate or stand later once you're done frosting.
- Now, frost! Add a dollop of frosting to first cake layer and smooth with a butter knife to edges, then add another cake layer, and continue until you get to the top!
- Garnish with candied carrot curls! Or eat it as is!
- Peel outer layer off carrots, then use peeler to peel long/wide slices of carrot
- Add water and sugar to pot over medium heat and when sugar is dissolved add carrots.
- Turn heat to low and simmer carrots for 15 minutes.
- Drain carrots and allow to cool for 10 minutes
- Lay carrots out on parchment lined baking sheet and bake at 200 degrees for 20 minutes
- Remove carrots from oven and wrap around a straw (I used my handy metal one) or spoon handle to get curls. Gently slide off straw and place back on parchment.
- Bake curly carrots for another 20 minutes.
- Cool completely and use to garnish cake