Last Minute Gift Guide: Make

holidaywreathdiy
 
Holiday wreaths are an easy way to bring a lot cheer on the cheap to your home, and they make great gifts too!

I prefer them a little weird and wild (like most things in life), but you can use this technique for almost any material you choose.

And the only supplies you’ll need are a wire wreath form, paddle wire, and some snips. Easy peasy.
 
holidaywreathdiy2
 
First up- grab yo’ greens! Do it in a park, and try not to look…awkward.

I chose noble fir, cedar, and seeded eucalyptus from the LA Flower Mart for around $3.50/bunch and used about 1/3 bunch per 12″ wreath. For the behemoth in that first photo, you’ll need around 2 bunches of everything.

You can also forage your greens in the wild or at your local tree lot/Home Depot, where they’ll usually give you the branches they cut off the bottoms of trees for free.
 
holidaywreathdiy3
 
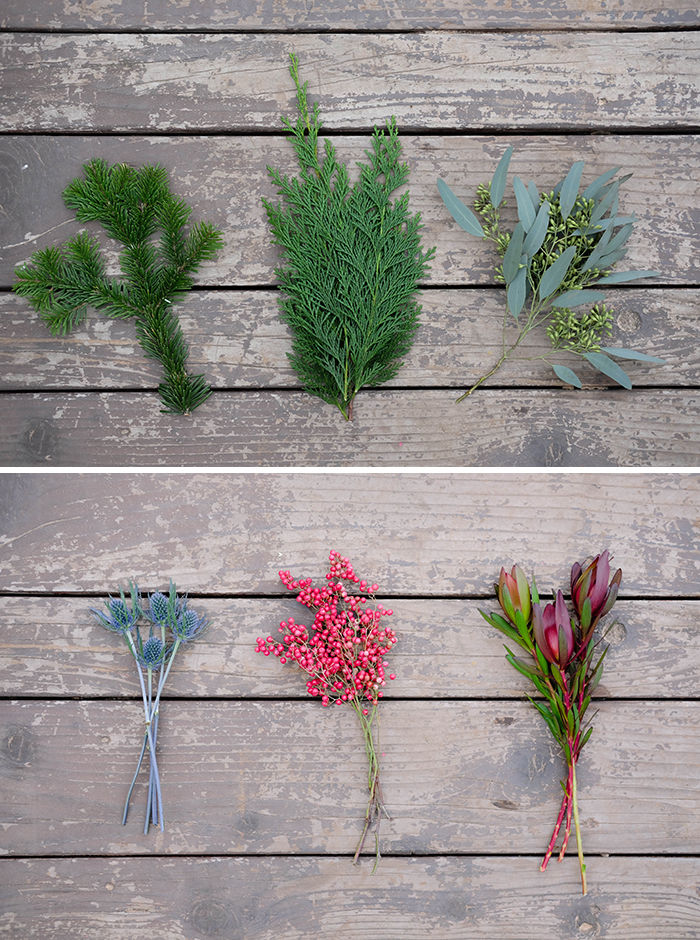
Now for some fun (and long lasting) accents- thistle, naked pepperberry, and red safari.
 
holidaywreathdiy4
 
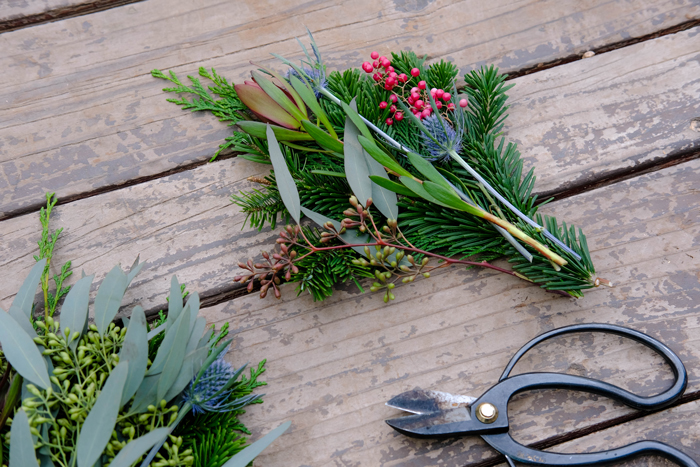
Make small and pleasing bunches of greens + accents.
 
holidaywreath5
 
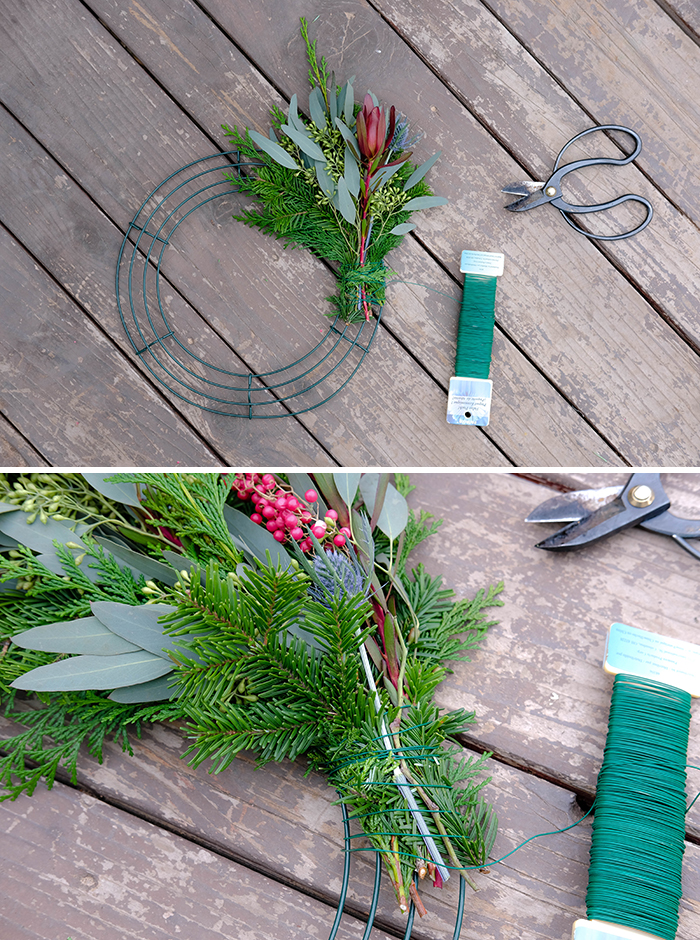
Place your first bunch on your wreath form and use the paddle wire to secure it. No need to be pretty or too precious- just make sure it’s secure and DON’T cut your wire.
 
holidaywreathdiy6
 
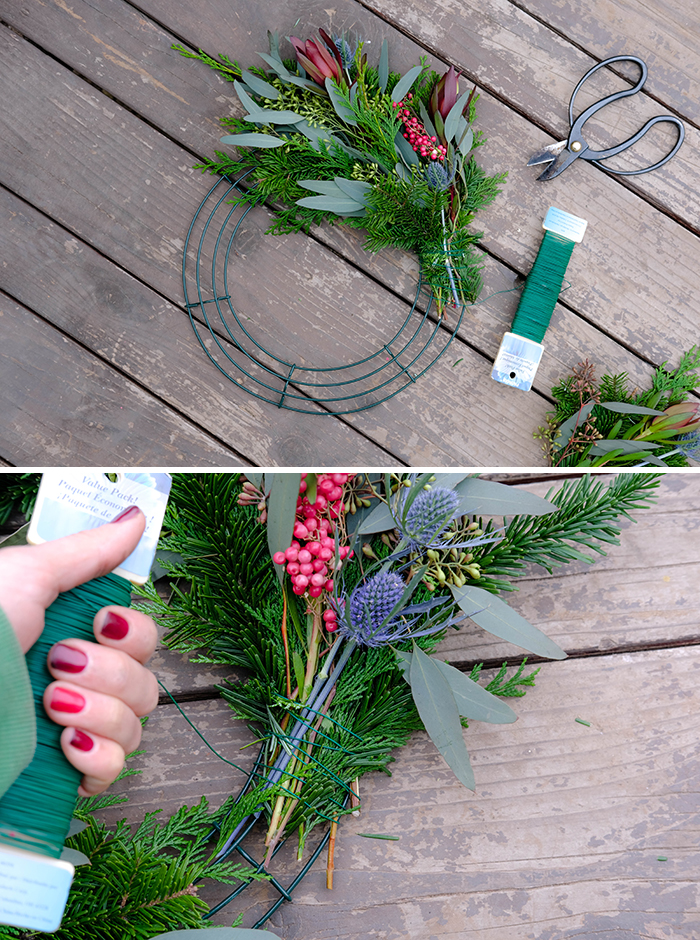
Lay down your next bunch directly below the first one, so that the top of your second bunch covers up your messy wires. Secure it in place and DON’T cut your paddle wire.
Rinse and repeat.
 
holidaywreathdiy7
 
Voila! Not too shabby for $10 and 20 minutes, right?!

And if a wreath isn’t up your alley, here are 4 more gifts to make:

Vanilla Extract
Preserved Lemons
Homemade Bitters
Chewy Caramels

And yes, they’re all edible, because if you’ve been invited to a holiday party, your host/ess probably already has enough cheese logs, tea towels and kitchen tchotkes!


Mini Carrot Cake (gluten free…)

carrotcakeplates

BUT STILL DELICIOUS!

Sorry to yell at y’all (6 months in New Orleans!) but I do feel like this is an important disclaimer, because even here in LA (land of gluten free everything) gluten free baked goods aren’t always the most delicious.
Or moist. Gross word, but true.

This little cake, however, is an economy sized vehicle of SUV sized flavor. Wait, that’s a terrible metaphor. This little cake is an economy sized vehicle for mouth-wateringly amazing flavor of Monster Truck magnitude. Okay. I give up. This little cake is just plain delicious- it’s full of flavor (and carrots!) and it’s really easy to make.

carrotcakeplates

It doesn’t require any fancy cake pans or piping bags or dare-I-say baking skills. It’s a winner. And the adorable boyfriend told me it was better than the carrot cake at the bakery across the street. And carrot cake is his favorite, so I actually believe him. High praise. Also, not to harp on the GF thing, but neither of us are gluten free, so if this wasn’t delicious, I’d just throw a shit ton of regular flour in it and be done already.

carrotcakesolo

candiedcarrotcurls

The candied carrot curls are definitely the most difficult part of this recipe. And they’re really more sticky than difficult. But damn, they’re cute, right?! Not to mention they’re basically carrot candy. Health food I tell you.

You can even make them a few days ahead of time if you like, since besides being sticky, they’re a little time consuming. Or you can skip ’em entirely and get right to the cake eating!

slice2

5.0 from 1 reviews
Mini Carrot Cake (gluten free...)
 
This gluten free carrot cake is cute AND delicious! It looks fancy with all it's layers, and difficult with ALL those directions, but it's really simple to make!
Ingredients
The Cake:
  • 1 cup grated carrots (I used 5 organic, aka puny carrots)
  • 1¼ cups almond flour
  • ½ cup coconut milk
  • 2 eggs
  • 1 teaspoon cinnamon
  • ½ teaspoon nutmeg
  • ½ teaspoon salt
  • ½ teaspoon baking soda
  • ¼ teaspoon allspice
The Cream Cheese Frosting
  • 1 stick butter (8 tablespoons)
  • 1 package cream cheese (8 oz)
  • 1 cup powdered sugar
  • 1 teaspoon vanilla
The Candied Carrot Curls
  • 2 carrots
  • ½ cup water
  • ½ cup sugar
Instructions
  1. Grate the carrots- they should be one level above carrot zest or mush, but still pretty fine. (I used our cheese grater)
  2. Mix all ingredients for cake in a bowl and pour into a buttered 9x13 pan.
  3. Bake cake at 350 degrees for 20-25 minutes.
  4. While cake bakes, make the frosting: mix softened butter & cream cheese with sugar & vanilla in a stand mixer or by hand until smooth and creamy.
  5. Let cake cool completely, then use a large empty can (29oz) to cut 4 round cake layers.
  6. Cut a round piece of parchment paper by tracing the can and put this under the first cake layer on a flat plate- the parchment makes it easy to move your cake to a clean plate or stand later once you're done frosting.
  7. Now, frost! Add a dollop of frosting to first cake layer and smooth with a butter knife to edges, then add another cake layer, and continue until you get to the top!
  8. Garnish with candied carrot curls! Or eat it as is!
Candied Carrot Curls (can be make a few days ahead of time)
  1. Peel outer layer off carrots, then use peeler to peel long/wide slices of carrot
  2. Add water and sugar to pot over medium heat and when sugar is dissolved add carrots.
  3. Turn heat to low and simmer carrots for 15 minutes.
  4. Drain carrots and allow to cool for 10 minutes
  5. Lay carrots out on parchment lined baking sheet and bake at 200 degrees for 20 minutes
  6. Remove carrots from oven and wrap around a straw (I used my handy metal one) or spoon handle to get curls. Gently slide off straw and place back on parchment.
  7. Bake curly carrots for another 20 minutes.
  8. Cool completely and use to garnish cake
Notes
I like to pop my cake in the freezer for 10-15 minutes after frosting to firm it up- I just cover it with an upside down tupperware/jar so the frosting doesn't get messed up AND so the cake doesn't absorb any weird freezer odors. After it comes out of the freezer, I use a metal spatula to transfer it to my cake stand, parchment round and all!


Quick & Easy Pozole

pozole3

Yes, summer soup might seem a bit silly, but let me make my argument:
It’s delicious. It’s delicious. It’s delicious.

Okay, if mere repetition doesn’t convince you, then I offer these three (perhaps more) salient points:

1. It’s practically no-cook and can be ready in 20 minutes. Maybe less if you’re quick.
2. It’s refreshing. Spritzed with fresh lime juice, this is practically a chicken margarita.
3. Food for days. For 20 minutes worth of work.

Are you convinced now?
Because I do have a few more arguments in my back pocket…

pozole2

Or I can just let all that delicious garnish speak for itself.
Avocado. Radish. Lime. Cilantro. Tostadas.
Get. in. my. mouth.

I would also like to mention that this soup made a believer out of my friend Dana who usually hates the stuff.
Sure she was on post-surgery painkillers and my captive prisoner lunch guest, but I’m pretty sure she actually
loved this pozole.

And while I’m in a confessional mood, I should probably mention that I stole this recipe from my unassuming boyfriend. Okay, okay, I might have asked nicely what all went in it, and he might have given me a vagueatbest list.

That’s the beauty of this recipe-
it’s pretty libertarian…

You like spicy? Awesome, chuck in some peppers. You’re veggie? Leave out the chicken. And the spices?
I’m pretty sure cumin is the only constant in our kitchen.

And while this recipe is comprised of what I would call wholesome convenience foods (rotisserie chicken, tomatillo salsa), feel free to start from scratch. It’ll just take a bit longer. In other words, please don’t eat raw chicken.

Regardless of how you make it (we do it differently nearly every time) this is quickly becoming one of my favorite weeknight dinners! And I wouldn’t feel the least bit bad serving up a vat of the stuff to some last-minute company either.

Summer soup,
it’s what’s for dinner.

pozole1


Fast & Easy Pozole
 
This recipe is fast, easy, and adaptable- feel free to change up the ingredients to suit your time constraints and taste!
Ingredients
For the Pozole:
  • 1 rotisserie chicken, shredded/ripped in chunks
  • 1 onion, sliced in rings
  • 1 large can hominy, drained + rinsed (29 oz)
  • 1 jar tomatillo salsa (12 oz)
  • 1 quart veggie or chicken stock
  • 3 cloves garlic, chopped
  • 2 teaspoons cumin
  • 1 teaspoon Chesapeake Bay (or Old Bay, or similar)
  • ½ teaspoon cayenne
  • ½ teaspoon chili powder
  • ½ Spike (or salt)
To Garnish:
  • avocado
  • cilantro
  • radish
  • lime
  • tostadas
Instructions
  1. In a stock pot or dutch oven, saute onions until translucent.
  2. Add garlic and spices to onions and continue to saute until garlic is fragrant (1 minute)
  3. Add stock, salsa, hominy, and chicken and bring to a boil.
  4. Reduce heat and simmer for 15-20 minutes or longer if you like.
  5. Enjoy your soup garnished with avocado, radish, cilantro and a healthy squeeze of lime!